Frequently asked questions
What are sheeted tiles?
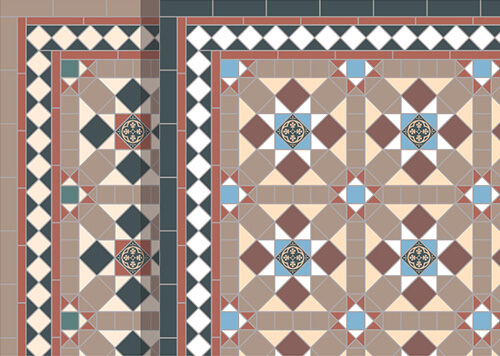
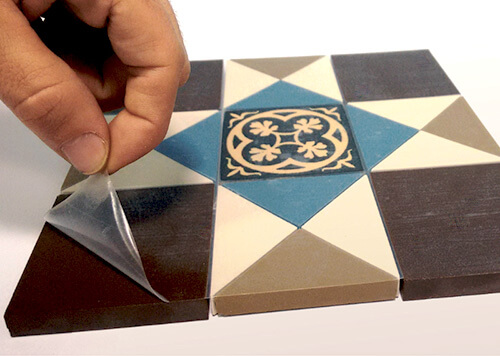
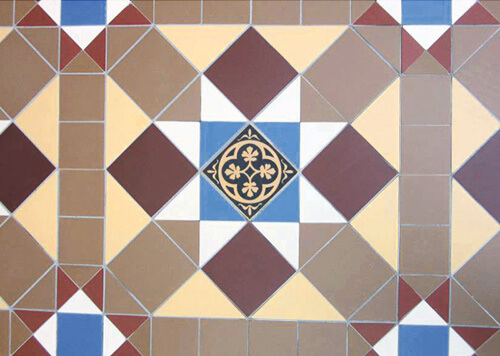
Victorian mosaic floor tile designs comprise various small geometric shapes to create repeating and tessellating patterns. By hand, we assemble the tiles and attach a clear adhesive tape to the surface, allowing for the installation of multiple tiles in one application. You can find more details on our About sheeted tiles page.
What type of sheet is used?
A clear adhesive film is applied to the surface of the tiles holding them in place. Compared with other methods, such as an underside mesh, our system has the following advantages:
1. Protects the tiles and grout lines from contamination
2. 100% contact with the adhesive used
3. Allows the fitter to fully view the design
4. Tape is easily removed without water
5. Easily cut with a craft knife for adjustments
6. Provides levelling, minimising the chance of exposed edges
7. Our sheets are waterproof and rugged, so are easily stored
8. Easily transported
Does the sheeting tape leave a residue?
The adhesive on the transparent sheet we use to hold tiles in place is designed to minimise or eliminate residue on the tile's surface. Due to various factors such as atmospheric conditions and batch production of this adhesive tape, a small amount of residue can detach from the tape and remain on a tile's surface. After installation, you can easily remove this residue with a spirit-based solution.
What colour grout should I use?
Always use grey grout, and never use coloured or highly pigmented grout for floor tiles. View our recommended grouts on the Adhesive and grout page.
What is the spacing of the tiles?
The tile spacing varies slightly but is never greater than 1.5mm. We understand that to achieve an authentic look, the grout lines must be kept to a minimum but wide enough to take fine grout, which adds structural integrity to the finished floor.
What are Victorian floor tiles made of?
These reproduction Victorian floor tiles are pre-moulded, unglazed, fully vitrified (heat treated) ceramic (clay) and are made using a process called dust pressing, and more details can be found on the Technical details page.
Do I need to send accurate dimensions?
We encourage you to send dimensions that are as accurate as possible. However, it is not necessary to be millimetre perfect, as there is always a tolerance in the outer-most border when installing our designs. For guidelines on sending us dimensions, please see the How to buy page.
Do the tiles need sealing?
Our range of tiles has very low porosity, less than 0.5%. When tiles are installed in an exterior location, we recommend using a water-based sealant. Interior tiles can be sealed with a clear impregnating sealant. You can see the products we stock and recommend on the Sealants and cleaning page.
Can I have a polished look?
We do not recommend a polished finish as this can be difficult to maintain.
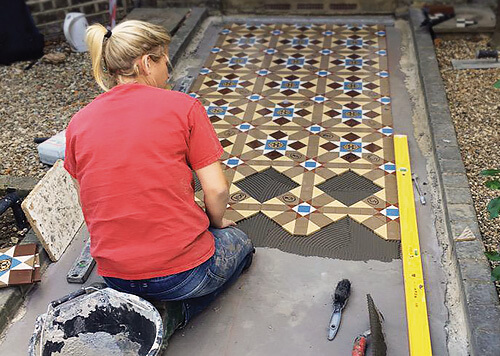
Do I need a specialist to install the sheeted tiles?
No, our sheeted tile system has been designed to broaden the possibilities of using all well-qualified professional tilers. We will assist you in finding a fitter for your installation. If you order a complex design in a loose format, then we would suggest finding a Victorian tile specialist - there are very few that are able to achieve the quality of finish that is required.
Do the tiles match the original period tiles?
Our range of tiles match the quality of original tiles and encompass colours that have been used to create period floors. The range includes some very good matching colours. You can order free tile samples to check the quality and colour of our tiles.
Can I use your range of tiles to match original floor?
Most original floors are based on the imperial measurement system. Our pre-moulded range is similar in that the tiles are made in the same way, but the sizing is based on the metric system and consequently they are not suitable for repairs as the equivalent tile would be slightly smaller. We can however provide good matching colours in a large format tile (150 mm x 150 mm) that can be cut to size as required. Our Heritage quality range is best suited for restoration works.
How are the tiles delivered?
We generally supply our sheeted tiles in double wall cardboard boxes clearly labelled with the contents. Smaller orders are carefully boxed then floated in a larger box for courier delivery. For larger orders we use a pallet service and for delivery within London a same day courier service is available. We deliver throughout the UK as well as internationally. Further details can be found on the How to buy page.
What kind of base is required?
Tiles are commonly and ideally fixed to cement bases. Timber bases are also possible and there are many adhesive manufactures offering products for this solution. Either way the recommended base should be sound, smooth and solid. The sheeted tiles respond particularly well to to a smooth flat base.
Substrate requirements for an external path
In general when installing tiles to an external path leading to a residential property, it is important to provide a substantial and reinforced cement base on which to bond the geometric tiles. The following process is recommended:
1. Remove all existing material in order to expose either earth or clay to an approximate depth of around 6-8 inches (150 – 205 mm).
2. Hard core should be installed and compacted as an initial layer.
3. A screed should then be installed incorporating a reinforcement of either a fibre additive or a steel mesh. This commonly will be composed of an initial layer of ballast, followed by a top layer of a sharp sand screed. Method and composition may vary but the screed should be reinforced as a good practice to minimise the potential for cracking, movement and subsidence.
4. The finished level should be the correct depth to allow for the thickness of the tiles as well as the adhesive used (11mm - 12mm).
5. The screed should also be as flat and as smooth as possible with the correct run off for water away from the property, to the pavement.
6. Once installed the screed should be covered with plastic for approximately 2 days to provide protection form the weather to allow the screed to harden. The recommended curing time required before tiles are fixed should be between 4-6 weeks.
Are the tiles compatible with underfloor heating?
Yes, but please ensure that the adhesive used is compliant with the system. Most adhesive manufacturers recommend waiting one month after installation of the tiles to turn on the under floor heating. The tiles will not be affected by subtle changes in heat.
What kind of adhesive is required?
We recommend that a grey rapid set adhesive is used to fix our sheeted product whenever possible. View our recommended adhesive on the Adhesive and grout page.
Are the tiles suitable for walls?
Tiles such as these are ideally suited to floors but can also be used on walls. Please note the 9mm thick tiles weight approximately 20kg per square metre. The thinner Ceramic micro mosaic range would be most suitable for use on walls.
Are the tiles suitable for a bathroom or kitchen?
Yes, these ceramic tiles are suited for use in a bathroom and kitchen. In these environments the tiles will be exposed to much more dirt, grease and grime - in which case the tiles will require several coats of a sealant and careful maintenance. You can see the sealants we stock and recommend on the Sealants and cleaning page.
How thick are the tiles?
The range of Victorian floor tiles we supply are 9mm thick.
If you are preparing a base and want the tiles to sit level with other flooring, we recommend to allow a 11mm - 12mm depth so as to include a solid bed of adhesive around 2mm - 3mm.
Our Ceramic micro mosaic tiles have a thickness of 3.8mm and 5mm. The Heritage quality range is 11mm thick.
Are the tiles suitable for a wet area?
With the correct base preparation and aftercare treatments our range of tiles can be used anywhere, from swimming pools to commercial environments.
Are the tiles suitable for fireplaces?
Traditionally glazed tiles were used in fire hearths, however these days most fireplaces tend not to function at all in the way they used to. Our advice is if it is an open working fireplace where fuel is combusted then the recommended type of tile should be glazed. However we regularly supply our sheeted designs to clients with fireplaces that function in a more modern way, providing a more than suitable decorative feature.
Do you accept credit cards over the phone?
Yes, we accept all major debit and credit cards. Other payment methods are via online bank payments (BACS transfer), cheque payments, and for smaller value transactions we also accept PayPal.
Do you have a showroom or shop?
We currently do not have a show room or shop, we operate a workshop and office.
Do you install as well as supply tiles?
We specialise in managing and implementing large scale projects in the London area, including installation. As we are unable to install all our supplied sheeted projects, we are therefore happy to refer you to qualified tradesmen to carry out installations.
Can I collect my order from your workshop?
All products can be collected from our workshop. We are open Monday to Friday, 9am to 5pm. There is parking available and a member of staff will assist in loading your order. Please note that a square metre of tiles weighs approximately 20kg and the carrying capacity of your vehicle will need to be checked as large orders are heavy. For orders over 15 square metres we would recommend that we courier your order to site in a suitable van or via a pallet truck.
Do you offer a restoration service?
Yes, we have over 20 years experience in restoring Victorian floor tiles and other period mosaic features, mainly throughout London, and continue to offer this service. Please see our Restoration services page for more details.
Are sheeted tiles more expensive than loose?
Yes, we take loose pre-moulded tiles and apply them to a sheet and therefore invest time to create an improved product. This added value is more than balanced by the time and costs saved during the installation.
Why should I choose London Mosaic?
We have endeavoured to ensure that the information on our website is clear and comprehensive in order that a good comparison can be made with other Victorian floor tile suppliers and specialists in the industry. To date we are not aware of another company who deliver a product and service in as thorough and unique a way as ourselves, including our bespoke Victorian floor tile sheets. If you have any further questions please feel free to call or email any time. Our office is open Monday to Friday for enquiries.